SOP - Zapier Connections
Table Of Contents
HS-ZAP-001 Daily Task - Checking Automated Approval Errors In Zapier
HS-ZAP-002 General Run Down of Zapier - How It Works
HS-ZAP-003 General Run Down of Hubspot Workflows - How It Works
HS-ZAP-004 Hubspot Email Templates
HS-ZAP-005 Specific Zap Set Up For Missed Call / Voicemail Automatic HubSpot Tasks
(SOP Created by Corey Wesley, 2020)
Contact Fraser 778-302-7471 / yossariancreative@gmail.com with any questions or for assistance with urgent issues.
HS-ZAP-001: Daily Task - Checking Automated Approval Errors
(Below instructions must be done at least once a day, ideally at 11am.)
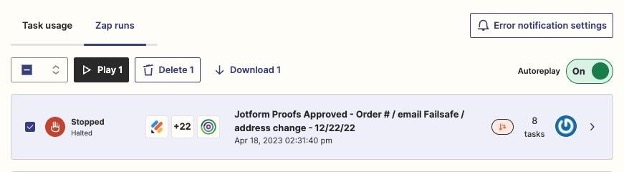
1. Click Zap History from the navigation bar on the left.
2. Scroll down and find the Zap named “Jotform Proofs Approved - Order # / email Failsafe / address change - 12/22/22”, click the three dots on the right, then hit “View Runs”

3. Once loaded, click the bar in the center that says “All statuses”. Then from the dropdown select “Stopped / Errored” and “Stopped / Halted”. These are the approvals we need to check.


- There are only usually a couple a day. Most of the time the approvals have still gone through to Hubspot fine but we just need to double check and verify. Click on each one, one by one. When loaded, find the order number, it should be in the second section named “2. Found Value inStorage.”
-
In outlook, find the approval form receipt. Verify that they did not change the shipping address. The Shipping Address field would show below the Approver’s Email field if they did.
6. Head to HS and search the order number. Verify if this approval was received. If not and the Deal Stage is still in Proofs Sent. Manually move the order into Production - Ready For Production.
7. If the client did change their shipping address, be sure to create a pinned note with the new address, leave an Internal Note saying “new address” and paste the new address in the Shipping Address field.
8. Once you are certain the order in HS is in Ready For Production, head back to Zapier. Click out of this particular Zap Run. Select the Zap Run you were just in and then hit “Delete”.
9. Repeat steps 4-8 if there are multiple Zap Runs.

HS-ZAP-002: General Run Down of Zapier - How It Works
1. Zap Folders
a. Home - General zaps, most common Zaps
b. Ashore - Old not used.
c. Big Commerce - Mostly processing every order and pushing into HS
d. Design Job Flows - All automation with design jobs
e. Dot Digital - Mostly tracking numbers auto-emails. After hours auto response. Refund emails.Proof follow up auto-emails. Order complete, review.
f. Legacy - old
g. Ring Central - Missed calls and voicemails, automated tasks in HS.
h. Shopify - Pushing new orders into HS
i. zOld Versions / Tests - Old, not in use
j. zSlack Tests - Old, not in use
2. My apps - These are connections we have built into Zapier already
a. BigCommerce - Catching new orders. See triggers below.
b. DotDigital - automated emails
c. Dropbox - Auto creation of folders etc.
d. Dropbox Sign - Not in use.
e. Hubspot
f. Jotform - Artwork uploads, design uploads and auto approval forms. Triggering to then push into HS.
g. Livechat - Not in use
h. Mailchimp - Not in use (I think - 4/19/2023 FS)
i. Microsoft Office 365 - Has connections with automated emails and DotDigital I believe
j. RingCentral - All missed calls / voicemail tasks.
k. ShipStation - Not in use. SS account canceled.
l. Shopify - Catching new orders. See triggers below.
m. Slack - Not in use.
n. SMS by Zapier - Not needed, I believe not in use.
o. Storage by Zapier - This app finds information from the trigger, e.g a deal in HS.And then stores the information for you to use further down in the zap.
3. Triggers - This is the first step in a zap
a. Webhooks. This is when another website/software/app/platform pushes a webhook out into the world, Zapier webhook catches it to then run the zap. We use this a lot. Often with Hubspot. So a deal changes in Hubspot, we have created a HS Workflow to catch this deal change. Then it pushes a webhook out, which Zapier catches to then do its run.
b. Specific apps connections. Big Commerce, Shopify, Ring Central have their own Apps within Zapier. We have connected our accounts within so when something happens in our BC/RC/Shopify accounts we can immediately catch to trigger a zap.
4. Action - This is every subsequent step in a zap
a. Format. This will grab information caught in the trigger and reformat it. One example we use this for is in the auto tracking email zap when there are multiple tracking numbers in a field in HS. It grabs the information/field from that specific deal which was caught by the Trigger. When there is a [new.line] (ie a second tracking number as we put them on different lines within the field in HS) it will move it to the same line and instead put a comma between the two tracking numbers. This is useful because further down the line in the zap we are putting this output of the two or more numbers with comma(s) between to put into a hyperlink in the email being sent to the client. We also use this in auto emails to catch the Date / Time when a zap has been triggered. We reformat the exact date to just output the year, then in the auto email being sent to the client in the footer it says “© 2023 TradeShowBooth.com” (whatever the year is at the exact time a zap is run).
b. Delay. We use this to pause the zap from proceeding further for a certain amount of time. We use this for creating Dropbox folders when we receive a new order. When a new order comes in BC we have one zap that creates the Deal in HS. We also have a different zap to create the DB folder. That one uses the same BC app as the trigger for when a new order is receives. But then it delays for 9 minutes. This is very important because it is giving time for the deal to be automatically created in HS by the other zap first before proceeding with creating the DB folder and then copy and pasting the DB proof folder or design folder URLs into the backend fields of the deal in HS.
c. Filter. Only continue if a certain condition is met. Information caught in the trigger.
d. Specific Apps.
i. Hubspot: We use the Hubspot app connection Action a lot. For example in the creating DB folders zap, the trigger is a new order in BC. It then delays as mentioned above, and then we use the specific HS app within Zapier to “Find the Deal” in HS. Once found we can then use other actions to update the deal (put in the URL links for the DB folder etc). We’re also using Find Deal and Update Deal actions when a client uploads on the websites. Jotform is the trigger, new form submission. The HS App Action then grabbing the order number from the form, finding the deal in HS and then the next action is updating the deal in HS to put in the IHD, the upload notes, the uploader’s email address and changing the deal stage to Artwork Uploaded. We can use the HS Action to create tasks and lots of other things. Essentially, every time there is a piece of magic happening in HS it’s because of Zapier or a HS Workflow.
ii. Dropbox. With these actions we are creating DB folders etc.
iii. DotDigital. With these actions we are actually sending the automated emails.
e. Path. This creates rules and acts as a branch, like if/then. It can create more than 2 paths. When you click on Path A (or any other path) it will take you to the PathRules.
Path Rules: You must then set up the conditions to determine whether a zap run will go down Path A/B/C etc. E.g in the Auto Tracking Email zap we have FedEx Only / UPS Only / FedEx & UPS paths. The rules are set up to go down one of these paths depending on whether there is a tracking number in those fields in Hubspot. You would first choose the “field” (note that this is not necessarily a HS field, this is talking about any field from previous stages within this zap) that would determine the path from previous stages in the Zap. This could be from a “Find Deal” in Hubspot or it could be from a Jotform upload for example. Path Rule Conditions: Once you’ve chosen the determining field that you want to condition for this path. There are lots of different options. Most commonly we use “Exists”, “Does Not Exist”, “Text Exactly Matches”, “Text Contains”, “Number is Greater Than”, “Number is less than”. In the example mentioned above with the tracking number we use exists / does not exist. If FX tracking field value (a tracking number within this field in HS) exists but the FX Hardware tracking field does not exist then head down this path. We also use another Path switch further down the line to determine how many tracking numbers are within that field in HS. E.g if UPS Tracking field value is more than 20 digits but less than 40 digits we can determine that there are 2 tracking numbers in this field in HS (UPS tracking numbers are 18 digits/characters long so less than 20 is 1, more than 20 less than 40 is two etc).
-
CRITICAL FOR MAKING CHANGES TO EXISTING ZAPS - I recommend right clicking the zap you wish to edit and “cloning” it. Make sure the clone is switched off then make changes to that clone and run tests. Once you know that it is good and everything is working properly, turn that cloned zap on and turn the old zap off. Change the name of the old zap to say “Old” at the end and move to the Old folder.
In general, it’s simple enough in theory and you can reverse engineer the zaps, to see how everything is working. It gets complicated because of the endless if/thens and rules to go down a certain path. The hard part is that you have to think like a computer and not a rational being. Creating the if/then rules become extremely confusing and layered. For example the auto-tracking email, the order being updated will travel through a potential of around 60-100 paths just to send one email depending on so many factors.
HS-ZAP-003: General Run Down of HS Workflows - How It Works
You can find in Hubspot by clicking Automation and then Workflows.
Creating new workflows:
1. Click Create Workflow in the top right, select From Scratch from the options.
2. The default is set to “Contact-Based” because pretty much everything we do in HS revolves around deals, make sure you change to “Deal-Based” before proceeding.
3. Select Blank workflow then Next.
4. Setup a trigger, filter type will usually be deal based. You can then search what you want the trigger to be. The most common property we use is “Deal stage”, we then do “Is any of” hit the dropdown and search the specific deal stage you want to trigger. We also use “has ever been” / “has never been any of” to trigger a few things.
5. Click Apply Filter. You can then add other conditions if you want the trigger to be more specific. Click the AND button or the OR button and add more filters.
6. Hit the + sign in the workflow map. You can then select your actions. We mostly use Delays, if/then branches, Create tasks, Set Property Value, Send webhook.
Random example:
You want to set a task when a client uploads artwork but their order has already been uploaded to the supplier. You would create the trigger Deal Stage is set to Artwork Uploaded AND Files Uploaded to Supplier is known. The next step would be to Create task to zSales & Support.
General info about some of our workflows:
● Anything working in the background of HS goes through a workflow here. Triggers will often be deal stage changes but can be a variety of different things. We then create various actions before resulting in an end action or task.
● We also send off webhooks when something is updated in HS so that Zapier could catch the webhook and run its automation for the specific need. (Like with the deal stage being updated to “Tracking to BC”. See the workflow “Tracking Number Email Trigger”.
Just two steps:
○ Deal stage is set to Tracking To BC. Company is TSB (or DO or GD)
○ Send the specific webhook.
● We use a lot of safety nets here. E.g, if a deal has the word “Design” in the Product Name field but is put in the Graphics pipeline, a task will be set to zSales & Support to double check if this order should be in the Design pipeline instead.
● Reminder tasks like Approval Deadline Approaching. This workflow is setup when a deal’s target approval deadline is less than 1 day away and the “Client Approval Date” field is unknown (this is how it determines that the order has not yet been approved).
● The Client Approval Date field is automatically filled when an order lands in the deal stage Ready For Production.
● Order over $4000 task. If deal “Amount” is greater than $4,000 create a task to zSales & Support.
● New orders from a Hommati franchise. Triggers when a new order is received and Deal associated to any contact where the email domain is equal to hommati.com. It’ll set the deal to Artwork Uploaded and send a task to zSales & Support with the instructions with how to proceed.
● Design flow. Triggers when deal stage set to Send Questionnaire. Posts a webhook for Zapier to catch which then runs its Zap to send the questionnaire email. HS Workflow then moves the deal stage to Questionnaire Sent. Delays for 1 day. If still in
Questionnaire Sent deal stage, sends a new webhook, which Zapier catches to send the auto follow up email. Then delays for 1 day. If still in Questionnaire Sent, creates a task to zSales & Support to follow up with client.
● 11 month follow up. Trigger is deal stage set to Client Received Order. Amount is greater than $2k. AND the Associated Company to the deal has not been modified within 300 days. This last condition means that if the client has ordered since this particular order their Company would have been modified with activity. So if they have ordered within the past 300 days there is no need to follow up with this client. If it passes through the conditions it will set a task to zSales & Support to reach out to see if the client has any upcoming shows.
HS-ZAP-004: Hubspot Email Templates
You can find in Hubspot by clicking Conversations and then Templates.
1. You can edit an existing template, create a new template from scratch or clone an existing template to then edit.
2. When needing to edit an existing email template, if it is a big change it is better to clone the existing one and then edit. If you are just making minor word changes etc you can edit the existing one and then to save be sure to click “Update Existing Template”.
3. When creating templates be sure to indicate if they are DO/TSB/GD. Put this in the name of the template, in any relevant folder and make sure the subject line of the email reflects the correct company. If making templates for all three websites, make the first one and then clone it. Make sure you update all wording and links to the website to reflect whether it is DO/TSB/GD.
4. To add automated information from the specific deal you use the “Personalize” button at the bottom when in the edit window. Most of our existing (and likely future personalizations) will be Deal based. Make sure you select Deal from the dropdown, the default is set to Contact. From here you can search specific fields that you would like embedded in the email body or subject line. For the proofing email template we are grabbing the following fields:
a. Deal Name
b. Target Approval Date
c. In-Hand Date
d. Target Approval Deadline (time)
e. Lead Time (Production + Shipping)
f. Shipping Address
HS-ZAP-005: Setting Up Missed Call / Voicemail Automatic HubSpot Tasks via Zapier
(Below instructions are for a Missed Call setup. If setting up the voicemail, replace all cases where “Missed Call” has been mentioned with “Voicemail”.)
1. Connect Ring Central Extension to Zapier
a. In Ring Central: Go to ‘Users’ tab and select the extension you are connecting.
b. Make sure the email has been verified. There will be a green checkmark on the user if it has been. If it hasn’t, verify the email under ‘User Details’.
c. In Zapier: Go to ‘My Apps’. Go to ‘Ring Central’, click ‘Add Connection’. Log in to the Ring Central extension you are connecting.
2. Make Property Field in HubSpot
a. First head to any deal, go to ‘View All Properties’ at the bottom of the property fields section on the left. Click ‘Manage Properties’. Click ‘Create Property’:
i. Object Type ‘Contact’
ii. Group ‘Automation Fields’
iii. Label “[Extension you are connecting] Missed Call”.b. Click Next and then Field Type ‘Single Checkbox’. Unselect Show in Forms. Click Create.
3. Make Workflow in HubSpot
a. Click Automation – Workflows – Create Workflow
b. Select ‘Contact Based’ then ‘Start From Scratch’. Click Next.
c. Set enrolment trigger:
i. ‘Contact Properties’ then search the new property field you just created in part 2‘[Extension] Missed Call’. Select Is any of ‘Yes’
ii. Click Re-enrollment heading at the top of the enrollment trigger. Check ‘Allow Contacts who meet…’ Also check the box below showing the trigger you have just made ‘[Extension] Missed Call’ is any of Yes.’ Click Save.
d. Click the plus button below the trigger. Search Create Task and select.
i. Type in the Title field: “[Extension] - Missed Call:” Continue in the title box, this time click Contact Token and search ‘Missed Call Number’ and select. Type “from”. Contact Token search ‘Missed Call Name’ and select. Type “to”. Contact Token search ‘Missed Call Extension’.
ii. Due Date ‘Immediately’. Email reminder ‘None’.
iii. In ‘Notes’ field copy and paste: “Call client back immediately and check the task as completed so the rest of the team know it's been done.”
iv. Scroll to bottom to Which Owner and select ‘zSales & Support’. Leave all other fields as is.
e. Click plus button below the task. Search ‘Clear Property Value’ and click. ‘Contact’ for the first field. For ‘Property to Clear’ search and select your new Property Field ‘[Extension] Missed Call’ and then save.
f. Hit the orange ‘Review’ button on the top right of the page. Name the Workflow at the top “[Extension] Missed Cal [Date]l”.
g. Under the first heading ‘Enrollment’ select ‘No, only enroll contacts who meet the trigger criteria after turning the workflow on’. Then click Turn On in the top right of the page.
4. Make Zap in Zapier
a. Click ‘Make A Zap’ Add RingCentral as the Trigger. Trigger Event = Missed Call. Click Continue.
b. Then choose the RC account you are connecting. Click ‘Test Trigger’ and then continue once successful.
c. Add Action ‘Filter by Zapier’, click continue. Filter setup only continue if “1 From Phone Number” “Exists”. Click continue.
d. Add Action ‘Formatter by Zapier’. Action Event ‘Numbers’, click continue. Set Up Action – Transform ‘Format Phone Number’. Input ‘1 From Phone Number’ To Format ‘xxx-xxx-xxxx (International, No Country Code)’. Phone Number Country Code ‘US’. Validate Phone Number ‘Yes’. Test Action. Continue.
e. Add Action ‘Hubspot CRM’. Action Event ‘Create or Update Contact’, click continue. Choose Account ‘HubSpot CRM Hub: 4118150 #3’. Setup Action ignore all except:
i. Contact Email e.g. ‘sales-tsb@tsb-missed-call.com’ Must be a unique domain from previous Zaps created.
ii. Missed Call Extension (the extension you are connecting)
iii. [Extension] Missed Call field ‘True’
iv. Missed Call Number ‘3. Fromphonenumber…’
v. Missed Call Name ‘1. From…’ Test action, continue.
f. Save. Turn On.
5. Test by calling the newly connected extension and hanging up (or leaving voicemail if that is the workflow you have just setup).